Showing posts with label iPhone. Show all posts

Monday, August 31, 2009

Notes on iPhone:Safari ComboBox in an app

One of the things lacking in the iphone is the combobox much like the one available to you when using safari on the iPhone. I decided to implement this functionality into my app, it's not perfect and could still use some more work to be as good as the one in Safari.

Here's a photo of the results. Without the pickerup
Heres one with the picker.

Okay the first thing your going to want is the picture for the drop down.
The basic implementation from a top level perspective is a UITextField that is not enabled. This is a simple approach that will get you what you want but could be better. The following creates the combobox in a given cell, this can be made more generic by making cell into a generic (id*) or (uiview*).


//params
//string default string to show if a user preference isn't already choosen
//field the UITextField you want to assign if you want to save it.
//cell the view you will add the textfield and button to
//action a selector for the uibutton
//fieldstring the user define string which may be empty so i pass it with the default string
- (void)comboboxwith:(NSString*)string withview:(UITextField*)field oncell:(UITableViewCell*)cell withSel:(SEL)action forfield:(NSString*)fieldstring{
//textfield creation
//basic reason for using UITextField it allows you to add a subview to the left or right
//of the text field
field =[[CustomTextField alloc] initWithFrame:CGRectMake(5, 3, self.tableView.frame.size.width-10, 38)];
field.borderStyle = UITextBorderStyleRoundedRect;
field.text = (fieldstring == nil || [fieldstring compare:@""] == 0) ? string : fieldstring;
field.font = [UIFont fontWithName:@"Helvetica" size:24.0];
field.autoresizingMask = UIViewAutoresizingFlexibleWidth;

//add the down arrow for list view
UIImageView *imgview = [[UIImageView alloc] initWithImage:[UIImage imageNamed:@"downarrow.png"]];
field.rightView = imgview;
field.rightViewMode = UITextFieldViewModeAlways;
[imgview release];
field.enabled=NO;
[cell addSubview:field];

//uibutton creation on top of uitextfield, plain transparent button that listens to touchs.
UIButton *bnt = [UIButton buttonWithType:UIButtonTypeCustom];
bnt.frame = CGRectMake(5, 3, self.tableView.frame.size.width-10, 38);
bnt.autoresizingMask = UIViewAutoresizingFlexibleWidth;
bnt.backgroundColor = [UIColor clearColor];
[bnt addTarget:self action:action forControlEvents:UIControlEventTouchUpInside];
[cell addSubview:bnt];
}

As for loading the UIPickerView on selection of the combobox, the selector handles to loading of the uipickerview and toolbar with the done button as to exit from the uipickerview. As follows:


//load a uipicker with states, you can give the picker a tag, and a default state if
//loaded from a preference or something.
- (void)selectstate:(id)sender{
[self pickerwith:@"States" withId:0 withdefault:state];
[self adddone];
}

//this loads the uitoolbar and changes its location so that the done button is displayed
//above the uipickerview
- (void)adddone{
UIBarButtonItem *done = [[[UIBarButtonItem alloc]
initWithTitle:@"Done"
style:UIBarButtonItemStyleDone
target:self action:@selector(done:)] autorelease];
UIBarButtonItem *flex = [[[UIBarButtonItem alloc]
initWithBarButtonSystemItem:UIBarButtonSystemItemFlexibleSpace
target:self action:nil] autorelease];
self.navigationController.toolbar.barStyle=UIBarStyleBlackTranslucent;
[self.navigationController.toolbar setFrame:CGRectMake(0,self.parentViewController.view.window.frame.size.height-(216+40), 320, 40)];
self.navigationController.toolbar.hidden = NO;
self.toolbarItems = [[[NSArray alloc] initWithObjects:flex, done, nil] autorelease];
}

//creates the actual picker
- (void)pickerwith:(NSString*)string withId:(int)tag withdefault:(NSString*)defaultstring{
//loads the array from a plist file
NSString *bPath = [[NSBundle mainBundle] resourcePath];
NSString *plistFile = [bPath stringByAppendingPathComponent:@"Root.plist"];
NSDictionary *settingsDictionary = [NSDictionary dictionaryWithContentsOfFile:plistFile];
selectionarray = [settingsDictionary objectForKey:string];
[selectionarray retain];

//if picker is not nil close a previous picker
if(picker != nil){
[self done:self];
}

//create picker
picker = [[UIPickerView alloc] initWithFrame:CGRectMake(0, self.parentViewController.view.window.frame.size.height-216, 320, 216)];
picker.delegate=self;
picker.dataSource=self;
picker.showsSelectionIndicator=YES;
picker.autoresizingMask = UIViewAutoresizingFlexibleWidth;

//if defaultstring is defined load the picker at that index.
if(defaultstring != nil ){
NSInteger ind = [selectionarray indexOfObject:defaultstring];
[picker selectRow:ind inComponent:0 animated:NO];
}

//since we are inside a tableview disable scrolling
//better response from picker
self.tableView.scrollEnabled=NO;
picker.tag = tag;
[self.view.window addSubview:picker];
}

//remove picker and toolbar should put toolbar back in place if needed.
//reload data
- (void)done:(id)sender{
self.navigationController.toolbar.hidden = YES;
self.toolbarItems = nil;
[picker removeFromSuperview];
[picker release];
picker=nil;
self.tableView.scrollEnabled=NO;
[self.tableView reloadData];
}

As for the UIPickerView delegates I am not going to cover as you can look that up elsewhere.

A better approach to this problem would be to use a uiview subclass, and put a uitextlabel on the left side and a uiimageview on the right side, do the same as above with the loading of the pictures and adding this view as a subview to the parent view.

Once you do that you have the combobox look without any functionality to do that you have two approaches, the first is implement touchesdidbegin and touchdidend, I could be wrong on function names this is more for future proofing, then use this to determine if your uiview has been touch properly and load up the picker as above. Another apporach is to implement the uiview subclass a a UIControl subclass which allows you to use the following:

-(void) addtarget:self withselector:action forEvent:UIEventType

this makes it a uibutton basicly and its a lot simpler to work around. Once you have it loading up the Picker all you have to do is in the didSelectRow delegate method for the UIPickerView is tell the UITextLabel to show the text currently selected.

I hope this was convient, and informational. The last thing I have to say is for further improvement the next view button should also be implemented.

Monday, August 10, 2009

Notes on iPhone:MapKit, CFNetwork, and Push Notifications Part 1

This is my first tutorial so for those of you here looking for tips and hints bear with me as I get the hang of this.

Alright the first thing I am going to cover is how we can use Push Notifications to keep track of downloads of our app. I am also going to be using MapKit as a means of allowing users to see where others who have used our app are located. It isn't going to look pretty but hopefully the code with help you.

Am hoping to make this a library so that I can just kinda plug it in to any other application I make in the future.

So first step, Lets open up xcode and start a new tab bar applications.
why tab bar?
1. we want one of the screens to be a map
2. we want to display stats of our app.

We are going to handle the view before any code.

Okay first thing we are going to want to do is add a few IBOutlets for UILabels in the first view controller. You could also use a table or any other means you want to display the statistics. Just make sure to incorporate a quick way to change stats.

Note make sure to connect them properly.

Here is what mine looks like: MainWindow.xib

so what do these terms mean:
(removed Installed but was too lazy to change pic)
Open how many people actually opened the app
Removed how many people deleted the app
Reinstalled how many people reinstalled and open the app again.

This is what my FirstViewController.h looks like

#import "UIKit/UIKit.h"


@interface FirstViewController : UIViewController {

IBOutlet UILabel *opened;

IBOutlet UILabel *removed;

IBOutlet UILabel *reinstalled;

}


@property (nonatomic,retain) IBOutlet UILabel *opened;

@property (nonatomic,retain) IBOutlet UILabel *removed;

@property (nonatomic,retain) IBOutlet UILabel *reinstalled;


@end


FirstViewController.m make sure to synthesize and dealloc

#import "FirstViewController.h"


@implementation FirstViewController

@synthesize opened;

@synthesize removed;

@synthesize reinstalled;


- (void)dealloc {

[opened dealloc];

[removed dealloc];

[reinstalled dealloc];

[super dealloc];

}


@end


Now for the map.

First add the MapKit Framework to the project.

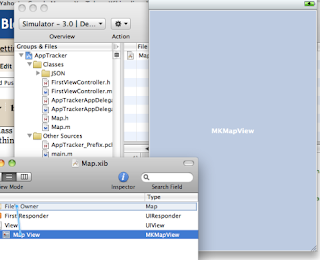
Create a subclass of UIViewController name it whatever, but for the sake of understanding name it something like map.h/m

As always you can create any subviews programmatically or through IB, am using the simple way IB. Don't forget to connect everything in IB. Also change the SecondView in the tab bar to the map.xib or simply rename to map.xib and alter. Last make sure you change the class of UIViewController in TabBarController.

Map.xib:


#import "UIKit/UIKit.h"

#import "MapKit/MapKit.h"


@interface Map : UIViewController {

IBOutlet MKMapView *map;

}


@property (nonatomic,retain) IBOutlet MKMapView *map;


@end


#import "Map.h"


@implementation Map

@synthesize map;


- (void)viewDidLoad{

//enable location on the map

[mapview setShowsUserLocation:YES];

[super viewDidLoad];

}


- (void)dealloc {

[map dealloc];

[super dealloc];

}


@end


now the last step on the initial step up is to register the device with your server and apple's push notification service as well. We are going to be registering as a Badge notification. The reason we are doing this is because if you do not actually send notifications you can't keep track of number of times your app gets removed, and for that matter reinstalled.

first step is to register with APN. To do this we simply call


[[UIApplicatio sharedApplication] registerForRemoteNotificationTypes:UIRemoteNotificationTypeBadge];


but we also need to implement the callback delegates

- (void)application:(UIApplication *)app didRegisterForRemoteNotificationsWithDeviceToken:(NSData *)devToken;

- (void)application:(UIApplication *)app didFailToRegisterForRemoteNotificationsWithError:(NSError *)err;


put all this in the AppDelegate.m

#import "AppTrackerAppDelegate.h"


@implementation AppTrackerAppDelegate


@synthesize window;

@synthesize tabBarController;


- (void)applicationDidFinishLaunching:(UIApplication *)application {

[[UIApplication sharedApplication] registerForRemoteNotificationTypes:UIRemoteNotificationTypeBadge];

[window addSubview:tabBarController.view];

}


- (void)sendProviderDeviceToken:(const void*)devToken{

}


//Delegate methods that tell you if you succeeded.

- (void)application:(UIApplication *)app didRegisterForRemoteNotificationsWithDeviceToken:(NSData *)devToken {

const void *devTokenBytes = [devToken bytes];

self.registered = YES;

[self sendProviderDeviceToken:devTokenBytes]; // custom method

}


- (void)application:(UIApplication *)app didFailToRegisterForRemoteNotificationsWithError:(NSError *)err {

NSLog(@"Error in registration. Error: %@", err);

}


@end


so now your wondering what goes in the sendProviderDeviceTokern. Well it depends on how you plan to implement your server, if you implement a low level server then something like BSD Sockets or CFNetwork is what you want to use. If you are using a php script then something NSUrl is what you want to use. In this case I want to learn CFNetwork so that what am using. CFNetwork has a few different connection type am using CFSocket API's.


#include "CFNetwork/CFNetwork.h"

#include "sys/socket.h"

#include "netinet/in.h"

#include "arpa/inet.h"


#define PORT 2048

#define IPADDR "127.0.0.1"


//this is the callback method that gets called when

//client opens up the connection to the server

//if you were using more than one callback type you would need

//to check before continuing but since we only

//used the connect callback there was no need.


void ConnectCallBack(CFSocketRef socket, CFSocketCallBackType type,

CFDataRef address, const void *data, void *info){

//gets the native socket its a BSD socket so

//all normal BSD socket methods work

//like send you need to close the socket

CFSocketNativeHandle sock = CFSocketGetNative(socket);

send(sock, info, sizeof(info)+1, 0);

close(sock);

}


//this will open up a socket to our server

//we use the connectcallback to know when the socket actually connects

//once connected you need to have ConnectCallBack write the

//devToken to the server.

- (void)sendProviderDeviceToken:(const void*)devToken{

//socket reference and context, which get past around in the callback method

CFSocketRef sock;

CFSocketContext context = { 0, &devToken, NULL, NULL, NULL };

//open socket with default allocator its a TCP socket in ipv_4

sock = CFSocketCreate(NULL, PF_INET, SOCK_STREAM, IPPROTO_TCP, kCFSocketConnectCallBack, (CFSocketCallBack)ConnectCallBack, &context);

//if can't create socket fail to send devtoken

if(sock == NULL){

NSLog(@"error");

}

else {

//put the address of your server and port

//port define above as well as ip address

struct sockaddr_in addr;

memset(&addr, 0, sizeof(addr));

addr.sin_len = sizeof(addr);

addr.sin_family = AF_INET;

addr.sin_port = htons(PORT);

addr.sin_addr.s_addr = inet_addr(IPADDR);

//create reference and connect to server

CFDataRef connectAddr = CFDataCreate(NULL, (unsigned char *)&addr, sizeof(addr));

CFSocketConnectToAddress(sock, connectAddr, -1);

//run the socket through run loop,

//if connects callback method is called

CFRunLoopSourceRef sourceRef = CFSocketCreateRunLoopSource(kCFAllocatorDefault, sock, 0);

CFRunLoopAddSource(CFRunLoopGetCurrent(), sourceRef, kCFRunLoopCommonModes);

CFRelease(sourceRef);

CFRunLoopRun();

}

}


ways to improve codebase make sure to include reachability checking. I hope this was helpful or interesting in some way. That handles the basics of getting the app running with the desired views. Look forward to server for push notification implementation and getting the actual data you want display. Ending with getting your location when you open the app and sending it to the server. Also more about JSON for both push notifications, and map points.

Sunday, August 9, 2009

Welcome

This is my first post so welcome all to my Blog. A little about myself, I am a freelance iPhone Developer/Software Developer. This blog will for the most part serve as a means of allowing me to create reference material for myself and others who find themselves in the same boat. I will also be posting about encounters with new technology, as well tutorials.

Also please post comments on errors I may have left, or simply not notice. All other comments welcome too.